

If you want to stay up-to-date on the latest trends in your industry, you need to be using APNs. But how do you set up unlimited data on an APN(Access Point Name)? Here’s a guide on how to do it! An APN is a phone number that you use to connect to your wireless provider. Your wireless provider assigns an APN to your cell or home phone, and you can use it to access the internet and download files. Here you will get complete knowledge of APN settings for unlimited data:
How Does an APN Work
When you set up an APN, your wireless provider will give you a number (or IP address) that identifies your cell or home phone. You need this number when you want to access the internet and download music, movies, or games. When you sign up for an APN, your wireless provider will assign you an appropriate route for using the internet with your cell or home phone. This means that if multiple routes are available for using the internet from your location, each one of these routes will be assigned to an APN by your wireless provider.
How Can You Get APN settings for Unlimited Data on Your Devices?

You can get unlimited data on any type of APN by following these steps:
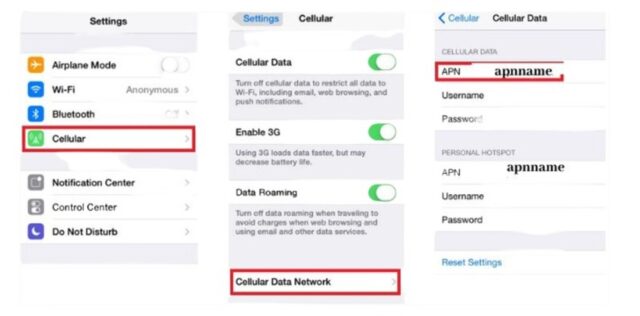
First, find the appropriate APN settings for unlimited data on your device: on most devices, this is done through Settings->Cellular->APNs; however there may be specific instructions given on how to do this in certain cases like Apple iPhone where Settings->Phone->Networking is more likely to work fine (for example).
Once you have found the appropriate APN settings for unlimited data on your device, simply add the provided APN (s) into a text editor like Notepad++ and hit enter: typically this will add all of the required lines together so that only one line needs to be changed per APN setting change ( Conversely if there are multiple APN settings for a given device and network coverage is poor then it’s recommended that all APN settings be used as they should), saving changes as new APN(s)=Yes/No.”
How to Set Up an APN Settings for Unlimited Data
To set up an APN on your cell phone, you will need to first create a Cell Number and Settings. Then follow the prompts to configure your settings. Once you have completed these steps, you can use the settings in Section 2.2 to connect to the APN that you have chosen.
To get unlimited data on your APN, you first need to set up your APN. To do this, go to the settings of your cell phone and select “network” as the network type. Then, enter the name of your APN in the “APN Name” field and click on the “set as default” button. Then, tick the box next to “use an existing account if available” and press OK. You will now be able to access your data using your new APN.
Use an APN to Access Your Data
If you want to use an existing account on your cell phone when connecting to a Wi-Fi network, you first need to create one. Go to Settings>Cellular https://blucellphones.us/apn-settings-for-unlimited-data/ and select “add new account” under ” Plans & Services”. Enter the name of your old account and tick the box next to “use an existing account if available” and press OK. You will now be able to access your data using your old account’s IP address.
How to Use an App to Access Your Data
There are a few things you need to use an app to access your data: an app, a phone, and internet connectivity. Once you have all of these things, you can start using the app to access your data. An app is a software application that can be downloaded onto a phone or computer. Apps allow users to access their information and content from a variety of devices, including smartphones and computers. When using an app to access data, make sure you are using the correct APN. To use data on an app, use the following steps: Select the appropriate app and enter your account information.
Choose how much data you want to use.
Type in your location or other important information.
Click “start” and enjoy your free data!
How to Use an App
The first thing you need to do when using an app is installed it. Once you have it installed, open it and sign in with your account information (username and password). Next, select the applications tab and click on the link for your favorite app. If you don’t have the app installed on your phone yet, go ahead and download it by clicking on the link below:
Once you have downloaded the app, open it and sign in with your account information (username and password). After signing in, select the applications tab and click on the link for your favorite app. Click on “install” to start installation:
When the installation is complete, select “use” from the pop-up window that appears:
Now that you have an app installed on your smartphone, start using it!
How to Upgrade an App
When upgrading an app on your phone, you’ll need to follow a few simple steps. First, head to the App Store and search for the new app you want to upgrade. Once you’ve found it, https://support.apple.com/en-us/HT202180 tap on the “Upgrade Now” button. Next, enter your existing account information and click on the ” Upgrade Now” button. Finally, select the desired language. After you’ve upgraded the app, tap on the “Finish” button to finish.
How to Access Your Data on an App
To access your data on an app, you need to create an account and enter the appropriate information. After you’ve created an account and entered your information, you can use the app to access your data.
The app will require some basic information such as your name and email address to start working with your data. Once the app has been initialized, it will begin working with the data stored on your device. You can use the app to view, edit, or delete all of your data at any time.
Conclusion
If you’re looking for an easy way to access your data on an app, an APN is a perfect solution. By setting up your APN and using it to access your data, you’ll be able to keep everything organized and efficient. Additionally, upgrading your app can help you manage all of your data more effectively.
Read our most popular articles: